

In order to use our operative system we need to format a micro sd card and create two partitions.
- The Boot Partition is a primary partition that contains all the files responsible for booting the operative system (OS). The bootloader initiates the bootstrap process by loading the OS into memory
- The System partition is a disk partition containing the operative system folder mounted at the root directory in Linux called with the slash simbol /.
Insert your SD in your card reader and run the fdisk command with root priviledges to identify the name of SD card, the device name is preceded by the /dev folder and its name looks like ‘/dev/DeviceName’.
If you open a terminal and run the command all the devices recognized by the computer will be displayed. The result of command was in my case a list of information related to my 500 GiB hard disk ‘sda‘ and a SD card identified by ‘sdb‘.
userk@dopamine:~$ sudo fdisk -l

Disk /dev/sda: 500.1 GB, 500107862016 bytes  <-- My Hard Disk
255 heads, 63 sectors/track, 60801 cylinders, total 976773168 sectors
Units = sectors of 1 * 512 = 512 bytes
Sector size (logical/physical): 512 bytes / 512 bytes
I/O size (minimum/optimal): 512 bytes / 512 bytes
Disk identifier: 0x00000000

   Device Boot      Start         End      Blocks   Id  System
/dev/sda1               1   976773167   488386583+  ee  GPT

Disk /dev/sdb: 3941 MB, 3941597184 bytes    <-- The Sd Card
53 heads, 21 sectors/track, 6916 cylinders, total 7698432 sectors
Units = sectors of 1 * 512 = 512 bytes
Sector size (logical/physical): 512 bytes / 512 bytes
I/O size (minimum/optimal): 512 bytes / 512 bytes
Disk identifier: 0x0002c262

   Device Boot      Start         End      Blocks   Id  System
/dev/sdb1            2048     7698431     3848192    b  W95 FAT32
It’s worth noting that the hard disk in the notebook appears in the first block and is sda. Note that all future operations will affect the other device, sdb. The last letter is extremely important. Don’t format your hard disk!
As you can see from the output the sdb device has one partition in /dev/sdb1 formatted in FAT32.
We need to unmount the partition, delete it and prepare the memory card to host the Operative System by creating the Boot and the Root partitions.
Two ways to proceed:
Gparted
Newbie Level
userk@dopamine:~$ sudo apt-get install gparted
userk@dopamine:~$ sudo gparted
Choose the device on the top right corner as shown in Figure 1.
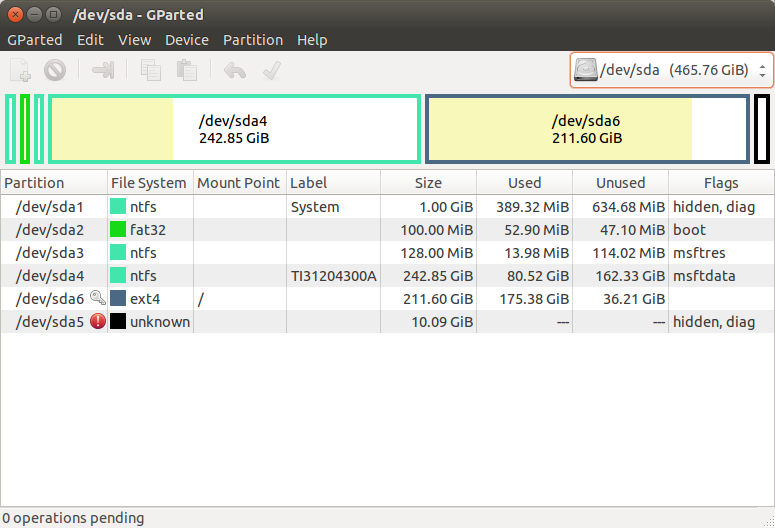
Figure 1: The hard disk partitions.
Change it from sda to sdb and you should see a windows like the one in Figure 2.
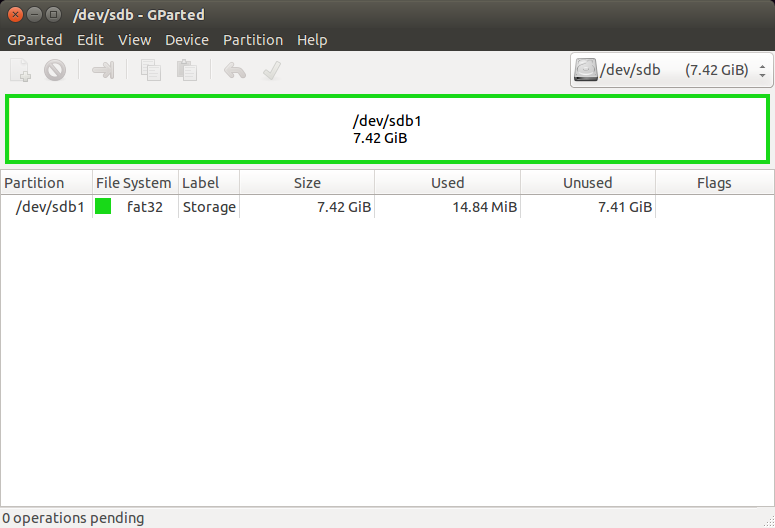
Figure 2: The sd card.
Then right-click on the partition and unmount it. Again right-click and delete it. You should now see an empty sd-card as shown in Figure 3.
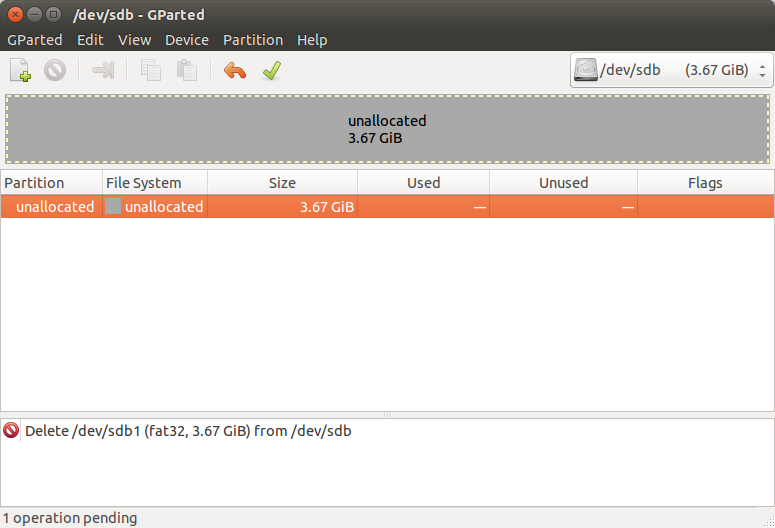
Figure 3: Space unallocated.
Now click on the green check to apply changes then click the close button. Gparted will scan your devices.
The Boot and the Root partition
As the Buildroot team suggests in their repository:
For a persistent rootfs, 10MiB is enough memory for the boot fat32
Gparted resizes it automatically to 33MiB. It’s fine.
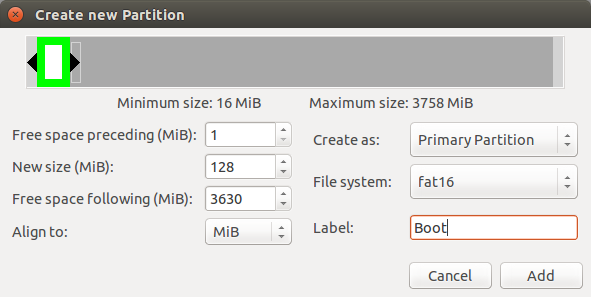
Boot partition
Now, create the Root partition. Click on the remaining space on the device and create a new partition. Set all the free space as dimension, Create as Primary partition, File System ext4 (or ext2) and Label Root.
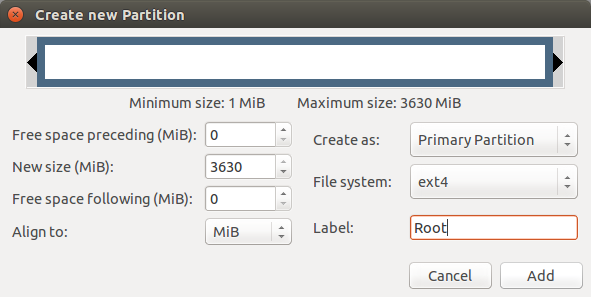
Root partition
Click on the green check to apply changes.
Eject and insert the SD-card. Verify the partitions with the fdisk command. You should see:
userk@dopamine:~$ sudo fdisk -l

Disk /dev/sdb: 3941 MB, 3941597184 bytes
122 heads, 62 sectors/track, 1017 cylinders, total 7698432 sectors
Units = sectors of 1 * 512 = 512 bytes
Sector size (logical/physical): 512 bytes / 512 bytes
I/O size (minimum/optimal): 512 bytes / 512 bytes
Disk identifier: 0x0002c262

   Device Boot      Start         End      Blocks   Id  System
/dev/sdb1            2048      33792      131072    b  FAT16  <-- Boot Partition
/dev/sdb2          69632     15564799     7747584   83  Linux  <-- Root Partition

Disk /dev/mapper/cryptswap1: 10.8 GB, 10835984384 bytes
255 heads, 63 sectors/track, 1317 cylinders, total 21164032 sectors
Units = sectors of 1 * 512 = 512 bytes
Sector size (logical/physical): 512 bytes / 512 bytes
I/O size (minimum/optimal): 512 bytes / 512 bytes
Disk identifier: 0xb4ebc362
Perfect, the SD card is ready.
The fdisk tool
Hard Core Level
In our case, the name of the SD card was /dev/sdb. The disk has only one partition. Let’s run the utility specifying the disk to work on.
userk@dopamine:~$ sudo fdisk /dev/sdbCommand action
a toggle a bootable flag
b edit bsd disklabel
c toggle the dos compatibility flag
d delete a partition
l list known partition types
m print this menu
n add a new partition
o create a new empty DOS partition table
p print the partition table
q quit without saving changes
s create a new empty Sun disklabel
t change a partition’s system id
u change display/entry units
v verify the partition table
w write table to disk and exit
x extra functionality (experts only)
By typing p, the partition table will be displayed, the output is the same as fdisk -l but related to the sdb device.
Now delete the partition sdb1 pressing d. The partition 1 will be automatically selected.
Command (m for help): d
Partition number (1-4): 1
Now the ‘p’ command will show an empty partition table. Or if your card contained more than one partition, the command will show the others.
Command (m for help): p

Disk /dev/sdb: 7969 MB, 7969177600 bytes
246 heads, 62 sectors/track, 1020 cylinders, total 15564800 sectors
Units = sectors of 1 * 512 = 512 bytes
Sector size (logical/physical): 512 bytes / 512 bytes
I/O size (minimum/optimal): 512 bytes / 512 bytes
Disk identifier: 0x00007519

   Device Boot      Start         End      Blocks   Id  System
Create a new primary partition using the n command and setting the partition type as Primary (p). The utility will ask you the number of the partition you want to modify, which is in our case the default value (1). Then you will be asked for the sector, press Enter. Now you need to set the size, we will specify to write 10 MiB. Press +10M.
Command (m for help): n
Partition type:
   p   primary (0 primary, 0 extended, 4 free)
   e   extended
Select (default p): p
Partition number (1-4, default 1): 1
First sector (2048-7698431, default 2048): Now, specify the partition’s system id by pressing t, set the system type to FAT32 (c) and toggle the bootable flag by pressing a.
Command (m for help): t
Selected partition 1
Hex code (type L to list codes): c
Changed system type of partition 1 to e (W95 FAT32 (LBA))

Command (m for help): a  <-- Toggles the bootable flag
Partition number (1-4): 1
Create a second primary partition for the file system with the entire remaining space as dimension.
Command (m for help): n
Partition type:
   p   primary (1 primary, 0 extended, 3 free)
   e   extended
Select (default p): p
Partition number (1-4, default 2): 2
First sector (264192-7698431, default 264192): [Enter]
Using default value 264192
Last sector, +sectors or +size{K,M,G} (264192-7698431, default 7698431):[Enter]
Using default value 7698431
Display the partition table with command ‘p’ and check if you have a 10MiB partition, formatted in Fat32, called Boot with the bootable flag and another primary called Root.
Command (m for help): p

Disk /dev/sdb: 7969 MB, 7969177600 bytes
246 heads, 62 sectors/track, 1020 cylinders, total 15564800 sectors
Units = sectors of 1 * 512 = 512 bytes
Sector size (logical/physical): 512 bytes / 512 bytes
I/O size (minimum/optimal): 512 bytes / 512 bytes
Disk identifier: 0x00007519

   Device Boot      Start         End      Blocks   Id  System
/dev/sdb1   *        2048       22527       10240    c  W95 FAT32 (LBA)
/dev/sdb2           22528    15564799     7771136   83  Linux
Write the table to disk and exit by pressing ‘w’.
Command (m for help): w
The partition table has been altered!

Calling ioctl() to re-read partition table.

WARNING: Re-reading the partition table failed with error 16: Device or resource busy.
Syncing disks.
If you get the above warning, umount the device from nautilus or with the following command and try again.
userk@dopamine:~$ sudo umount /dev/sdb1
userk@dopamine:~$ sudo umount /dev/sdb2
userk@dopamine:~$ sudo fdisk /dev/sdb
Command (m for help): w
The partition table has been altered!

Calling ioctl() to re-read partition table.
Syncing disks.
userk@dopamine:~$
The last step is to associate the names Boot and Root to respectively /dev/sb1 and /dev/sdb2.
userk@dopamine:~$ sudo /sbin/mkfs.vfat -n Boot /dev/sdb1
mkfs.fat 3.0.26 (2014-03-07)
mkfs.fat: warning - lowercase labels might not work properly with DOS or Windows
userk@dopamine:~$ sudo /sbin/mkfs.ext4 -L Root /dev/sdb2
mke2fs 1.42.9 (4-Feb-2014)
Filesystem label=Root
OS type: Linux
Block size=4096 (log=2)
Fragment size=4096 (log=2)
Stride=0 blocks, Stripe width=0 blocks
232464 inodes, 929280 blocks
46464 blocks (5.00%) reserved for the super user
First data block=0
Maximum filesystem blocks=952107008
29 block groups
32768 blocks per group, 32768 fragments per group
8016 inodes per group
Superblock backups stored on blocks:
	32768, 98304, 163840, 229376, 294912, 819200, 884736

Allocating group tables: done
Writing inode tables: done
Creating journal (16384 blocks): done
Writing superblocks and filesystem accounting information: done
Remove and insert the Sd card and check if nautilus sees the partitions.
Ok, we are done here. Now it’s time to set up the Cross-Compiler and build our minimal linux distribution.