


Hi guys! Let’s download the latest Raspbian Jessie Lite from the official RaspberryPi website.
userk@dopamine:~$  cd Downloads
userk@dopamine:~/Downloads$  wget https://downloads.raspberrypi.org/raspbian_lite_latest
--2016-06-14 01:09:06--  https://downloads.raspberrypi.org/raspbian_lite_latest
Resolving downloads.raspberrypi.org (downloads.raspberrypi.org)...

Saving to: ‘raspbian_lite_latest’

raspbian_lite_lates 100%[===================>] 292,27M  1,05MB/s    in 4m 14s

2016-06-14 01:19:00 (1,15 MB/s) - ‘raspbian_lite_latest’ saved [306465003/306465003]
Now, get a uSD card with more than 1 or 2 Gb of storage capacity,a min Class 10 microSDHC and get ready to write the image to it.
Run this command:
userk@dopamine:~/Downloads$  df -h
[...]
/dev/sdX1             15G  288K   15G   1% /media/userk/6564-6637
Now, insert the uSD in the internal or external reader, and rerun the above command. The new discovered device is your uSD, it should look like this /dev/sdX.
Please write your situation in the comment section. I will help you out.
You can now unmount the device in order to be able to write to it. We will assume that the device name is /dev/sdX. Change it to match yours.
userk@dopamine:~/Downloads$  sudo umount /dev/sdX
userk@dopamine:~/Downloads$  ls | grep raspbian
raspbian_lite_latest
userk@dopamine:~/Downloads$  unzip raspbian_lite_latest
Archive:  raspbian_lite_latest
  inflating: 2016-05-27-raspbian-jessie-lite.img
userk@dopamine:~/Downloads$  ls | grep jessie
2016-05-27-raspbian-jessie-lite.img
userk@dopamine:~/Downloads$  sudo dd bs=4M if=2016-05-27-raspbian-jessie-lite.img of=/dev/sdX status=progress
[sudo] password for userk:
1384120320 bytes (1,4 GB, 1,3 GiB) copied, 62,443 s, 22,2 MB/s
330+1 records in
330+1 records out
1387266048 bytes (1,4 GB, 1,3 GiB) copied, 62,9031 s, 22,1 MB/s
Security Update
From now on SSH will be disabled by default on our Raspbian images. SSH (Secure SHell) is a networking protocol which allows you to remotely log into a Linux computer and control it from a remote command line.
From the official webpage:
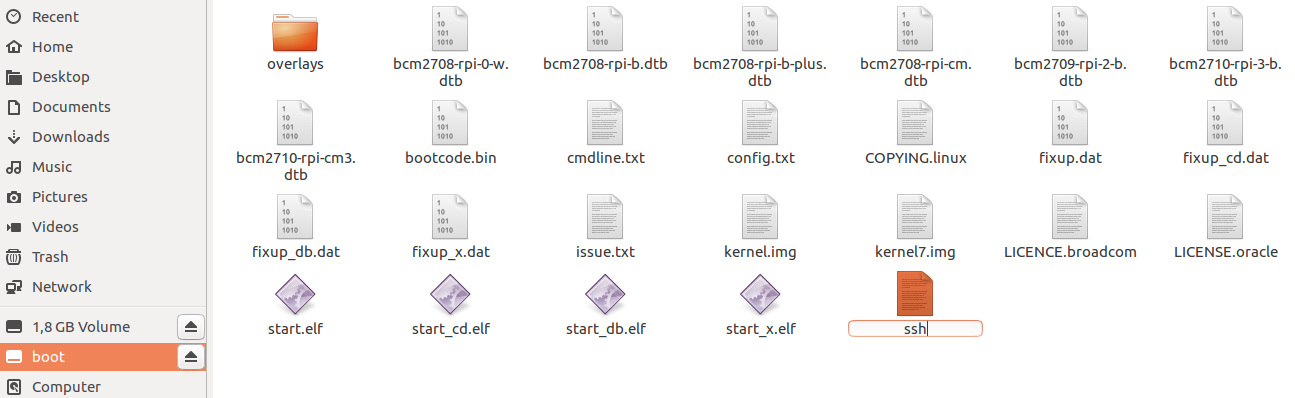
ssh in the /boot/ directory. The contents of the file don’t matter: it can contain any text you like, or even nothing at all. When the Pi boots, it looks for this file; if it finds it, it enables SSH and then deletes the file. SSH can still be turned on or off from the Raspberry Pi Configuration application or raspi-configSo, we need to enable the ssh by putting a file called ssh in the /boot/ directory. Safely remove the sdcard from the reader and insert it back into your computer. Open the file Explorer and click on the Boot partition. Add an empty file ssh.
The last step is to connect to the Rpi via SSH and test if everything worked well. Insert the uSD card in the Raspberry Pi 3 or 2 and plug in the ethernet cable. Wait 2 or 3 minutes and run the following commands from your laptop (I assume you are running an Ubuntu version but other GNU/Linux distribution are ok as well)
userk@dopamine:~$  sudo apt-get install nmap
userk@dopamine:~$  ifconfig
192.168.1.XX
userk@dopamine:~$  nmap 192.168.1.*
Nmap scan report for raspberrypi.********.*** (192.168.1.44)
Host is up (0.0070s latency).
Not shown: 999 closed ports
PORT   STATE SERVICE
22/tcp open  ssh

userk@dopamine:~$  ssh pi@192.168.1.44
pi@192.168.1.44's password:

The programs included with the Debian GNU/Linux system are free software;
the exact distribution terms for each program are described in the
individual files in /usr/share/doc/*/copyright.

Debian GNU/Linux comes with ABSOLUTELY NO WARRANTY, to the extent
permitted by applicable law.
pi@raspberrypi:~ $ we are in!

![Linux Utilities and Commands 1.20 – [Quick]](http://www.userk.co.uk/wp-content/uploads/2017/03/linux-500x383.jpg)

![[ Xenomai Experimental Result ] Dual kernel approach for a Real Time System with Raspberry Pi Model B](http://www.userk.co.uk/wp-content/uploads/2016/10/wall-500x383.jpg)