
In this post we are going to manipulate some wav files using Python. We would like to add some noise or sound to a recorded wav file.
Record your voice
Let’s record a sound sample of your voice using the rec command
userk@dopamine:~$ mkdir temp && cd temp
userk@dopamine:~/temp$ rec voice.wav
Input File     : 'default' (alsa)
Channels       : 2
Sample Rate    : 48000
Precision      : 16-bit
Sample Encoding: 16-bit Signed Integer PCM

In:0.00% 00:00:03.16 [00:00:00.00] Out:147k  [      |      ] Hd:0.0 Clip:0
PRESS CTRL+C
Aborted.
To play your recorded voice use the play command
userk@dopamine:~/temp$ play voice.wav
voice.wav:

 File Size: 590k      Bit Rate: 1.54M
  Encoding: Signed PCM
  Channels: 2 @ 16-bit
Samplerate: 48000Hz
Replaygain: off
  Duration: 00:00:03.07

In:100%  00:00:03.07 [00:00:00.00] Out:147k  [      |      ] Hd:0.0 Clip:0
Done.
By default, the rec command uses 2 channels and a sampling rate of 48kHz. This information is important since we are going the manipulate this file. For simplicity’s sake we will use sox to convert the sample to a single channel signal with 16kHz sampling rate.
userk@dopamine:~/temp$ sox -t wav voice.wav -t wav -r 16000 -b 16 -e signed-integer -c 1 voice1.wavThen listen to the newly created sample:
userk@dopamine:~/temp$ play voice1.wav

voice1.wav:

 File Size: 98.3k     Bit Rate: 256k
  Encoding: Signed PCM
  Channels: 1 @ 16-bit
Samplerate: 16000Hz
Replaygain: off
  Duration: 00:00:03.07

In:100%  00:00:03.07 [00:00:00.00] Out:49.2k [      |      ]        Clip:0
Done.
Download the sound sample
Feel free to download any sound you want but keep in mind that we are looking for a .wav file.
You can download a file directly from this link and use it with this tutorial.
So, for example let’s say you are interested in overlapping a car sound to your voice, then:
userk@dopamine:~/temp$ wget http://www.userk.co.uk/download/sound/machine.wav
userk@dopamine:~/temp$ ls
machine.wav
voice.wav
voice1.wav
We can analyze the characteristics of the sound file using avprobe from the package libav-tools.
userk@dopamine:~/temp$ sudo apt-get install libav-tools
userk@dopamine:~/temp$ sudo apt-get install libav-tools
userk@dopamine:~/temp$ avprobe machine.wav
Input #0, wav, from 'machine.wav':
  Metadata:
    encoded_by      : ZOOM Handy Recorder H4n
    date            : 2013-06-29
    creation_time   : 01:17:38
    time_reference  : 223584000
    coding_history  : A=PCM,F=48000,W=16,M=stereo,T=ZOOM Handy Recorder H4n
  Duration: 00:01:08.10, bitrate: 1536 kb/s
    Stream #0:0: Audio: pcm_s16le ([1][0][0][0] / 0x0001), 48000 Hz, 2 channels, s16, 1536 kb/s
As you can see the wav file has a sampling rate of 48kHz and 2 channels. We need to convert it using sox to match the characteristics of the recorded voice.
userk@dopamine:~/temp$ sox -t wav machine.wav -t wav -r 16000 -b 16 -e signed-integer -c 1 machine1.wav remix 2Please note that, in the above command, we have selected the second channel as source to extract the signal from.
Adding one file to the other using Python
Let’s get hands dirty! For our purpose we are going to use the numpy and audiolab library to, respectively manipulate wave files and perform Input Output operation such as open and save sound files.
Dependencies
We need the scikits learn, scikits.audiolab and the numpy python packages installed.
userk@dopamine:~/temp$ sudo apt-get install libsndfile1-dev
userk@dopamine:~/temp$ pip install scikits.audiolab --user
Here is the script we will be using
The first two lines import the required libraries, then lines 4 and 5 imports the previously saved sound samples and extract the encoding and sampling frequency information.
Lines 7 and 8 checks whether the sample have different encoding and sampling frequency.
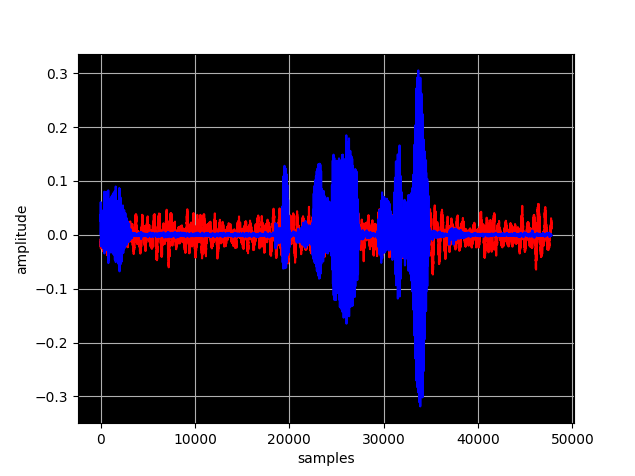
Line 10 picks a sub array of the same length of the voice signal from the wave file containing the noise. Note that we have used the numpy.split() method to cut the data2 array in three pieces and the // operand to execute a floor division. You can find more information about the division operand in python here.
Finally we create several noise affected samples in the for loop by weighting the noise signal.